http://www.rebeladmin.com/2015/01/configuring-trusts-part-2/


This is the part 2 of the series of articles which describes about trusts between infrastructures. If you still not read the part 1 of the series you can find it in here.
On previous article I explain what is a trust and common terms used in process. This article will be extend to it.
External Trusts – Let’s assume we have child domain called “HQ.contoso.com” under contoso.com forest. Company recently had business relationship with XYZ corp. They having child domain under the XYZ.com forest called “Sales.xyz.com”. As per business need management wants to allow users, resources in “Sales.xyz.com” to access data, resources in “HQ.contoso.com”. None of the other domains, child domains in both forest should allow in this operation. This is where we can use “External Trusts”. So it will only allow part of the forest to participate in unique operation.
Realm Trust – Also in real world Microsoft AD services is not the only directory services organizations uses. So it is not practical forcing another organization to change their directory services to match with ours to make trust. Realm trusts are helps to mitigate this issue and it allows to make trusts with active directory domain and non-Windows Kerberos version 5 realm(such as Linux directory service)
Forest Trusts – This is the most commonly used trust type. Using forest trust, one active directory forest will trust another active directory forest. These trust can be uni-directional trust or bi-direction trusts. By default forest trusts are “Trasitive”. It means any domain or child domain under these forests will be automatically trusted by each other (based on trust direction).
In forest trust we can use two authentication scopes according to our business requirement.
Forest-wide Authentication – This is the default authentication setting for forest trusts. Users in remote forest will be automatically allow to authenticate local forest resources. In here it doesn’t means any user in remote forest can access any resources. They still need pass the ACL, permission rules resources used. This authentication model is recommended for the organizations with multiple forests.
Selective Authentication – Using this method we can allow selected users, groups in remote forest to access resources in local forest. This is the best option to control access security while maintaining a forest trust.
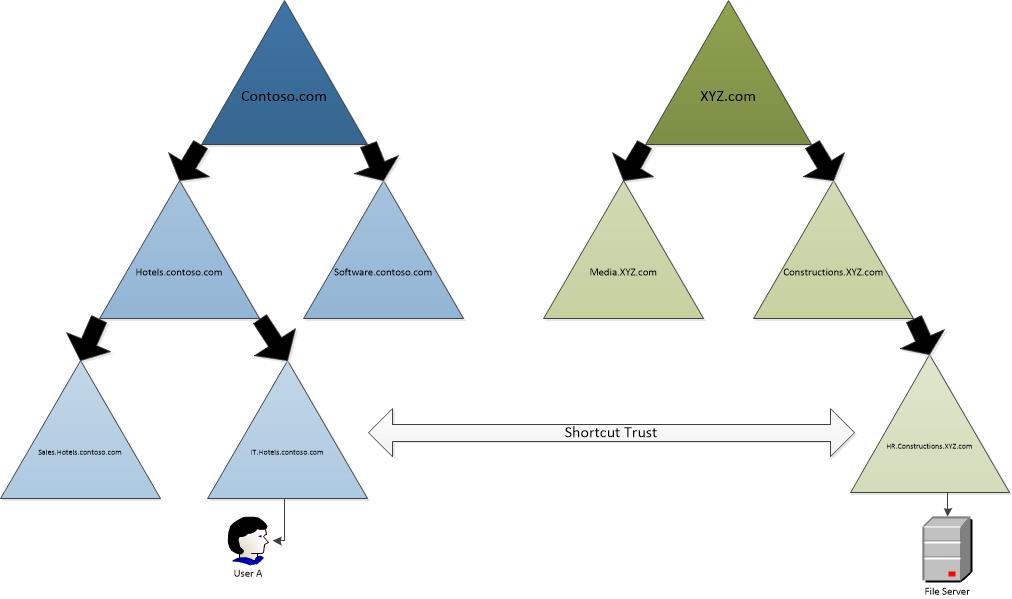
Shortcut Trusts – Let’s assume we have two forests called contoso.com and XYZ.com. As per below image both forests do have several domains and child domains. We do have a user called ‘User A” in “IT.Hotels.contoso.com”. He needs to access a file share from a server located under “HR.Constructions.XYZ.com”.

Now if we think about the authentication process it will need to pass the traffic all the way up to root domain in both forests. Sometime these child domains may located on different countries or cities. These may also connect through slow links due to high cost. So this traffic does effect regular operations.
Shortcut trusts allows to pass authentication traffic between IT.Hotels.contoso.com and HR.Constructions.XYZ.com directly without going through domain tree. Shortcut trust can be bi-directional or uni-directional.
This is the end of Part 2 of the series
Comments